
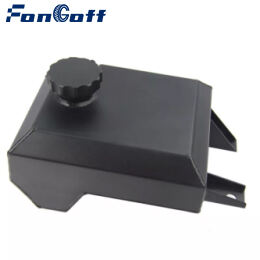
की दृश्य जांच ओवरफ्लो टैंक
दरारों और ऐंठन की पहचान
जांच रहे हैं ओवरफ्लो टैंक दरारों और ऐंठन की पहचान कूलिंग सिस्टम की अखंडता बनाए रखने के लिए महत्वपूर्ण है। तापमान में उतार-चढ़ाव या भौतिक प्रभावों के कारण अक्सर दरारें हो जाती हैं, जिससे टैंक कमजोर हो जाता है और लीक होने लगता है। निरीक्षण के दौरान रोशनी के कम होने पर भी फ्लैशलाइट का उपयोग करना लाभदायक होता है, क्योंकि कुछ दरारों को उचित प्रकाश के बिना देखना मुश्किल हो सकता है। ऐंठन का पता लगाने के लिए टैंक के आयामों को मापें और उन्हें निर्माता के विनिर्देशों से तुलना करें। किसी भी विचलन का मतलब संरचनात्मक कमजोरी होता है, जो ऑप्टिमल वाहन प्रदर्शन बनाए रखने के लिए एक महत्वपूर्ण चिंता का विषय है।
कूलेंट अवशेष या डिस्कलरेशन का पता लगाना
ओवरफ्लो टैंक के आसपास कूलेंट अवशेषों की निगरानी करना महत्वपूर्ण है, क्योंकि यह संभावित रिसाव का संकेत दे सकता है। ऐसे रिसाव इंजन के ओवरहीट होने का कारण बन सकते हैं, यदि उनका समय पर समाधान न किया जाए। टैंक की सतह का रंग बदलना, विशेष रूप से पीलापन या हरे रंग की छायाएँ, कूलेंट के ओवरहीट होने या रासायनिक विघटन का संकेत दे सकती हैं। रिसाव की जांच करने के लिए, एक गीले कपड़े से टैंक को पोंछें; कपड़े पर कोई असामान्य रंग एक कूलेंट रिसाव की पुष्टि कर सकता है। नियमित सतर्कता से वाहन की क्षमता बनाए रखने में मदद मिलती है और गंभीर इंजन समस्याओं से बचा जा सकता है।
टैंक की संरेखण और स्थिरता का आकलन करना
ओवरफ्लो टैंक की उचित संरेखण और सुरक्षित फास्टनिंग, क्षरण के कारण होने वाले कंपन को रोकने के लिए महत्वपूर्ण है। गलत संरेखण के कारण कूलेंट बाहर आ सकता है या सही ढंग से काम नहीं कर सकता, जिससे ओवरहीटिंग का खतरा हो सकता है। एक स्तर उपकरण का उपयोग करके यह सुनिश्चित किया जा सकता है कि टैंक क्षैतिज और स्थिर बना रहे। इसके अतिरिक्त, यह देखना महत्वपूर्ण है कि क्या वाहन के संचालन के दौरान टैंक अत्यधिक कूद रहा है, क्योंकि अत्यधिक गति अंततः क्षति का कारण बन सकती है। इन मुद्दों को प्रभावी ढंग से संबोधित करके वाहन के प्रदर्शन और दीर्घायु की गारंटी दी जाती है।
लीक की पहचान करने के लिए एक दबाव परीक्षक का उपयोग करना
परीक्षण के लिए कूलिंग सिस्टम की तैयारी
दबाव परीक्षक का उपयोग करने से पहले, दुर्घटनाओं को रोकने के लिए ठंडा सिस्टम की सही तैयारी करना महत्वपूर्ण है। सबसे पहले इंजन को पूरी तरह से ठंडा होने दें; यह रेडिएटर और कूलेंट सिस्टम के साथ काम करते समय जलने या चोटों से बचने के लिए आवश्यक है। सुनिश्चित करें कि सभी वाल्व सुरक्षित रूप से बंद हैं और रेडिएटर कैप कसकर लगाया गया है, क्योंकि इससे सटीक दबाव पठन प्राप्त करने में मदद मिलेगी। इसके अलावा, दबाव लागू करने से पहले ठंडा सिस्टम के अन्य हिस्सों में पहले से मौजूद समस्याओं, जैसे कि दृश्यमान दरारें या ढीले होज़ कनेक्शन की जांच करें। यह व्यापक तैयारी सुनिश्चित करती है कि बाद के परीक्षण परिणाम विश्वसनीय हैं और प्रभावी रिसाव का पता लगाने में मार्गदर्शन कर सकते हैं।

रिसाव का पता लगाने के लिए सिस्टम दबाव का अनुकरण
प्रणाली दबाव का प्रभावी ढंग से अनुकरण करने और संभावित रिसाव का पता लगाने के लिए, दबाव परीक्षक को रेडिएटर या ओवरफ़्लो टैंक से सुरक्षित करें। यह महत्वपूर्ण है कि निर्माता द्वारा निर्दिष्ट स्तर तक दबाव डाला जाए, जो सामान्यतः 15 से 20 psi के बीच होता है, जिससे परीक्षण की सुरक्षित स्थिति सुनिश्चित हो। दबाव गेज का सावधानीपूर्वक निरीक्षण करें; दबाव में कमी प्रणाली के भीतर रिसाव का एक स्पष्ट संकेत है। इस प्रक्रिया के दौरान, हिसिंग ध्वनियों के लिए सुनें, जो हवा या कूलेंट के निकलने का संकेत हो सकती हैं। ये ध्वनि संकेतक अक्सर रिसाव के स्थानों का संकेत देते हैं, जिससे अधिक सटीक पहचान और उसके बाद मरम्मत में सहायता मिलती है।
होज़ कनेक्शन और सील की जांच करना
ढीलेपन या जंग के लिए क्लैंप्स की जांच करें
ऊष्मा निकास प्रणाली में रिसाव को रोकने के लिए हौज़ संयोजनों की अखंडता सुनिश्चित करना महत्वपूर्ण है। मैं हमेशा ओवरफ़्लो टैंक से जाने और आने वाली हौज़ से जुड़े सभी क्लैंप्स में जंग या संक्षारण के लक्षणों की जांच करके शुरुआत करता हूं। यदि कोई क्लैंप ढीला दिखाई देता है, तो मैं उसे स्क्रूड्राइवर या रिंच का उपयोग करके कस देता हूं। उन मामलों में जहां क्लैंप्स गंभीर रूप से जंग लगे या क्षतिग्रस्त होते हैं, मैं तुरंत उनका स्थान बदल देता हूं ताकि उचित सील सुनिश्चित हो सके। नियमित रखरखाव, इन क्लैंप्स की स्थिति की जांच और उसके रखरखाव को शामिल करते हुए, क्लैंप विफलता के कारण संभावित रिसावों को प्रभावी ढंग से रोक सकता है।
हौज़ की भंगुरता और लचीलेपन का मूल्यांकन
शीतलन प्रणाली में होज़ का नियमित मूल्यांकन उनमें होने वाले पहनने के शुरुआती संकेतों का पता लगाने और रिसाव को रोकने के लिए आवश्यक है। मैं इसके भंगुरता, दरार, या अत्यधिक पहनने के संकेतों की जांच करके शुरू करता हूं, जो अक्सर यह संकेत देता है कि उनका स्थानापन्न करने की आवश्यकता है। उनकी स्थिति का और अधिक मूल्यांकन करने के लिए, मैं प्रत्येक होज़ को धीरे से दबाकर और मोड़कर उसकी लचीलापन का आकलन करता हूं। कठोर होज़ अक्सर क्षय और संभावित भविष्य के रिसाव का संकेत देते हैं। निरीक्षण और स्थानापन्न में सक्रिय रहकर, मैं शीतलन प्रणाली की स्थायित्व में सुधार कर सकता हूं और क्षतिग्रस्त होज़ के कारण प्रणाली की विफलता के किसी भी जोखिम को कम कर सकता हूं।
अचानक गिरावट के लिए कूलेंट स्तर की निगरानी
एक आधारभूत कूलेंट स्तर की स्थापना करना
कूलेंट स्तर की प्रभावी निगरानी के लिए, यह महत्वपूर्ण है कि पहले एक आधारभूत स्तर स्थापित किया जाए जब इंजन ठंडा हो। ऐसा करने के लिए यहां कैसे करें:
- ठंडा होने पर कूलेंट स्तर की जांच करें : वाहन के मालिक के मैनुअल को संदर्भित करें ताकि कूलेंट स्तर की तुलना अनुशंसित स्तरों से की जा सके। ऐसा करने से आपको यह सुनिश्चित करने में मदद मिलेगी कि आप अपने विशिष्ट वाहन मॉडल के लिए सही मापदंडों का उपयोग कर रहे हैं।
- उचित उपकरणों का उपयोग करें : यदि उपलब्ध हो, तो सही माप प्राप्त करने के लिए डिपस्टिक या साइट ग्लास जैसे उपकरणों का उपयोग करें। यह वर्तमान स्तर के सामान्य सीमा में आने के बारे में स्पष्टता प्रदान करता है।
- आधारभूत स्तरों का दस्तावेजीकरण करें : भविष्य के संदर्भ के लिए इन प्रारंभिक मापों का रिकॉर्ड रखें। यह समय के साथ परिवर्तनों को ट्रैक करने में सहायता करेगा और कूलेंट स्तरों की बेहतर निगरानी की अनुमति देगा।
इस आधारभूत स्तर को स्थापित करना किसी भी अनियमितता की जल्दी और कुशलता से पहचान के लिए तुलना का एक बिंदु के रूप में कार्य करता है।
धीमे और अचानक परिवर्तनों की व्याख्या करना
कूलेंट स्तर में धीमे और अचानक परिवर्तनों के बीच अंतर को समझना संभावित समस्याओं के निदान के लिए महत्वपूर्ण है:
- धीमे कम होने की निगरानी करें : ये सिस्टम के भीतर धीमा लीक होने का संकेत दे सकता है। नियमित जांच से छोटी समस्याओं को बड़ी समस्याओं में बदलने से पहले रोका जा सकता है, क्योंकि लीक का समय रहे पता चल जाएगा।
- अचानक गिरावट की पहचान करें : कूलेंट स्तर में अचानक कमी अक्सर किसी बड़े रिसाव या सिस्टम विफलता की ओर इशारा करती है। इस व्यवहार के प्रति सचेत रहना महत्वपूर्ण है, क्योंकि इसकी तत्काल ध्यान और हस्तक्षेप की आवश्यकता होती है।
- लंबी ड्राइव के बाद नियमित जांच : लंबी यात्राओं या इंजन के लंबे समय तक संचालन के बाद, यह सुनिश्चित करने के लिए कूलेंट के स्तर की निगरानी करें कि यह अप्रत्याशित रूप से न गिर गया हो। कूलेंट के स्तर में किसी भी परिवर्तन की त्वरित पहचान इंजन के व्यापक क्षति से बचने में मदद कर सकती है।
धीमा और तीव्र गिरावट में अंतर समझकर, आप समय पर कार्रवाई कर इंजन के स्वास्थ्य को बनाए रखने और बड़ी खराबी को रोकने में सक्षम होंगे।
चलने के बाद गीले स्थान या पानी के जमाव की जांच करना
वाहन के नीचे रिसाव के स्थानों की पहचान करना
अपने इंजन को चलाने के बाद, अपने वाहन के नीचे गीले स्थानों या पुड़ल्स की जांच करना महत्वपूर्ण है, क्योंकि ये स्थान कूलेंट रिसाव के संकेत हो सकते हैं। रौशनी रहित क्षेत्रों में रिसाव की पहचान करने में फ्लैशलाइट का उपयोग करना सहायक होता है, खासकर ओवरफ्लो टैंक के आसपास, जो रिसाव के लिए एक सामान्य स्थान है। इन रिसाव स्थानों का सटीक मानचित्रण करना महत्वपूर्ण है, क्योंकि यह मैकेनिक्स को अपनी मरम्मत की कोशिशों को लक्षित करने में मदद कर सकता है। ध्यान रखें कि इन रिसावों का समय पर पता लगाना भविष्य में अधिक गंभीर इंजन समस्याओं को रोकने में सहायक हो सकता है।
कूलेंट को अन्य तरल पदार्थों से अलग करना
रिसाव का सही निदान करने के लिए, कूलेंट को तेल जैसे अन्य वाहन तरल पदार्थों से अलग करना महत्वपूर्ण है। आम तौर पर, कूलेंट अपने उज्जवल रंग—आमतौर पर हरा, नारंगी या पीला—और एक विशिष्ट मीठी गंध द्वारा विशेषता रखता है। यह तेल के विपरीत है, जो अधिक गहरे रंग का होता है और अधिक चिपचिपा होता है। इन दृश्य और स्पर्श अंतरों को समझने से रिसाव स्रोतों की सही पहचान में काफी मदद मिलती है। रिसाव करने वाले तरल पदार्थ के सटीक प्रकार को पहचानकर, आप सुनिश्चित करते हैं कि मैकेनिक उचित मरम्मत करें, इस प्रकार वाहन के प्रदर्शन को अनुकूलित बनाए रखें।
FAQ
वाहन में ओवरफ़्लो टैंक की जांच क्यों महत्वपूर्ण है?
इंजन के अत्यधिक गर्म होने या खराब होने के कारण होने वाले संभावित रिसाव से बचने के लिए ओवरफ़्लो टैंक की नियमित जांच करना महत्वपूर्ण है, जो वाहन की शीतलन प्रणाली की दक्षता और लंबी आयु सुनिश्चित करता है।
ओवरफ़्लो टैंक में दरारें और विरूपण वाहन पर कैसे प्रभाव डाल सकते हैं?
दरारें और विरूपण ओवरफ्लो टैंक की संरचनात्मक अखंडता को नुकसान पहुँचा सकते हैं, जिससे रिसाव और अक्षम शीतलन प्रदर्शन हो सकता है, जिससे अंततः इंजन क्षति का खतरा रहता है।
मैं ओवरफ्लो टैंक के आसपास कूलेंट अवशेष कैसे पहचानूं?
आप ओवरफ्लो टैंक के आसपास के क्षेत्रों का दृश्य निरीक्षण करके कूलेंट अवशेष देख सकते हैं और सतहों को एक गीले कपड़े से पोंछकर किसी भी असामान्य डिस्कलरेशन का निरीक्षण कर सकते हैं।
ओवरफ्लो टैंक के स्थिरता और संरेखण सुनिश्चित करने के लिए मैं किन उपकरणों का उपयोग कर सकता हूं?
एक स्तर उपकरण यह सुनिश्चित करने में मदद कर सकता है कि ओवरफ्लो टैंक क्षैतिज रूप से स्थिर है और वाहन संचालन के दौरान अत्यधिक कंपन को रोकने के लिए सुरक्षित रूप से तय किया गया है।
रिसाव की पहचान करने में दबाव परीक्षक का उपयोग क्यों किया जाता है?
दबाव परीक्षक सिस्टम दबाव का अनुकरण करता है, जिससे आप दबाव में गिरावट देखकर और किसी भी हिसिंग ध्वनि को सुनकर जो हवा या कूलेंट बाहर निकलने का संकेत देती है, रिसाव की पहचान कर सकते हैं।
मेरे वाहन के नीचे लीक हुए अन्य तरल पदार्थों के अलावा कूलेंट कैसे पहचानें?
कूलेंट आमतौर पर उज्ज्वल हरा, नारंगी या पीला होता है, जिसमें मीठी गंध आती है, जबकि तेल अधिक गहरे रंग का और अधिक घना होता है, जिससे दोनों के बीच अंतर करना आसान हो जाता है।
Table of Contents
- की दृश्य जांच ओवरफ्लो टैंक
- लीक की पहचान करने के लिए एक दबाव परीक्षक का उपयोग करना
- होज़ कनेक्शन और सील की जांच करना
- अचानक गिरावट के लिए कूलेंट स्तर की निगरानी
- चलने के बाद गीले स्थान या पानी के जमाव की जांच करना
-
FAQ
- वाहन में ओवरफ़्लो टैंक की जांच क्यों महत्वपूर्ण है?
- ओवरफ़्लो टैंक में दरारें और विरूपण वाहन पर कैसे प्रभाव डाल सकते हैं?
- मैं ओवरफ्लो टैंक के आसपास कूलेंट अवशेष कैसे पहचानूं?
- ओवरफ्लो टैंक के स्थिरता और संरेखण सुनिश्चित करने के लिए मैं किन उपकरणों का उपयोग कर सकता हूं?
- रिसाव की पहचान करने में दबाव परीक्षक का उपयोग क्यों किया जाता है?
- मेरे वाहन के नीचे लीक हुए अन्य तरल पदार्थों के अलावा कूलेंट कैसे पहचानें?